ComposiMold and ImPRESSive Putty work with a LOT of casting materials. We do our best to keep track of all the innovative materials with the hope of providing you tips for the variety of casting materials you can use. Click a casting material option to learn more. If you have a casting material that you don't see here, please ask us.


Acrylic resin, Epoxy, ComposiCast, Resin:
Acrylic and epoxy resins are excellent casting materials for ComposiMold and ImPRESSive Putty. Our ComposiCast is an epoxy resin formulated specifically for ComposiMold mold making materials. Most pourable acrylic resins are typically just clear epoxies. Epoxies work well for pieces up to 5 cubic inches. For larger castings of 5+ cubic inches, choose epoxies with longer cure times of 24+ hours. Experiment with freezing the mold prior to pouring epoxy resins that create a lot of heat during curing. Epoxy resins that require an added heat source for curing are not recommended. ComposiCast White, Black and Clear Casting Plastic are epoxies designed for use with ComposiMold and ImPRESSive Putty.
Many more videos on using resins are available on our YouTube Channel.
Bondo and Other Polyester Putties:
Bondo smells and it's unhealthy. But it is relatively inexpensive and you can find it at most hardware stores. Be sure to use it in a very well ventilated area and wear gloves. Bondo works excellent for mold making and casting in both the ComposiMold and ImPRESSive Putty. Larger pieces (depending on shape of about 3 solid cubic inches) will create quite a bit of heat and can melt ComposiMold so chill the mold prior to pushing in the Bondo casting material. ImPRESSive Putty can handle larger sizes because of its higher melting temperature (175 F vs. 135 F for ComposiMold).
Butter:
You can make a butter mold from lots of different objects. The mold making process is simple, and with ComposiMold-Flex the molds are easily removed from the butter.
TIPS for Butter Mold Making: We recommend ComposiMold-Flex for butter molds because the butter is soft and the flexibility of the Flex mold allows you to bend the mold around your butter. Chill the butter before pulling it out of the ComposiMold mold so it is firmer.
Chocolate:
Turn almost any object into Chocolate using a Food Contact Safe Re-usable Mold Making Material. With just one product, you can make dozens of molds. Pour or pipe many types of melted chocolate into your mold. Lightly tap or vibrate the mold to release air bubbles in the chocolate. No mold release is necessary for chocolates. Watch some of these videos to see the process in action.
The chocolate mold making process is great for decorate wedding cakes and birthday cakes with custom milk chocolate and fondant shapes. With ComposiMold, you can easily make your own chocolate molds instead of trying to find a plastic mold or using silicone molds that can only be used for one design. Unlike silicone molds that can only be made into one mold, ComposiMold can be re-melted and re-used to make dozens of unique chocolate molds. It is certified safe for food contact mold making applications.
Making a ComposiMold Candy Mold for Chocolate:
To make your first mold, start with a simple shape: something with one flat side. Melt the ComposiMold in the microwave and pour it over your object. Let it solidify or place it in the freezer for 30 minutes until the rubber mold is solidified. Pull out your original shape, and pour in your chocolate. The tips below will set you up for success when making chocolates for your cakes, cupcakes, or sugar treats.
- Make your chocolate molds quickly and easily by melting the ComposiMold in your microwave. A double boiler or a chocolate melter also works great for melting ComposiMold.
- You do not need to cool or freeze your mold for chocolate castings because chocolate should never be above 100 F.
- When you are making your mold, lightly coat your original shape with a food safe mold release such as vegetable oil. When casting chocolate, you typically do not need a mold release.
- Pour the melted chocolate into your unique mold using a spoon, stick, or brush to fill the mold. Tap the bottom and sides to get air bubbles out of the chocolate. You may also like using a squeeze bottle or small piping bag to push the chocolate into small openings and crevices.
- To solidify the chocolate castings, cool the chocolate in the mold by placing it in the refrigerator or freezer.
- De-Mold your chocolate by peeling the mold away from the delicious chocolate treat as much as possible so you don't put a lot of pressure on the chocolate.
- Enjoy your one of a kind custom chocolate castings. Don't forget: When you have made all the chocolate casts that you want with one mold, you can be remelt your mold to make over 35 other shapes.
Clay and air dry clay can be pressed into ComposiMold or ImPRESSive Putty. Because ComposiMold and ImPRESSive Putty are biodegradable, they cannot be used with slip casting. Do not use clay in a slurry form or the water will degrade the mold. ComposiMold-Firm and ImPRESSive Putty are excellent for stamping into the clay. The re-usability enables you to make a unique shape when necessary.
You may also be interested in reading about the Polymer Clay mold making.
Concrete and Cement:
If you want to make unique concrete molds, ComposiMold can help. Make your own unique concrete molds and re-use to make new molds. Just by re-melting, you can keep on making new molds: for counter tops, garden sculpture, rock walls, fireplaces, concrete stamping, and so much more.
Advantages of ComposiMold for your Concrete molds:
- Allows you to make new molds anytime you want
- Great detail, easy to make molds of almost anything
- Re-usable! No waste!
- The mold will need to be re-made after 3 to 8 casts in it (simple molds can be used longer). Use a mold release to extend mold life.
- Slow curing concretes require the concrete/water mixture to sit in the mold for a long time. The moisture may begin to degrade the mold. Choose a quick curing concrete to avoid this.


Cookie or Cookie Dough Shapes
Custom cookies and cupcakes are all the rage! Entire businesses are built on people's love for these small, sweet treats. With the right cookie dough recipe, specifically one that doesn't rise while baking, you can make any cookie shape you want. And with ComposiMold, you won't be limited by pre-made cookie cutter shapes that are available in your supply store.
1. Choose a found object with the shape you want or sculpt a unique shape out of polymer clay.
2. Pour melted ComposiMold over this shape.
3. Remove the original object and you've got your unique cookie shape mold.
4. Press your raw cookie dough into the mold and carefully remove. You can do this by flipping the mold over and bending the mold away from the cookie dough.
5. Transfer raw cookie dough shapes to a cookie sheet and bake per recipe instructions.
No Rise Cookie Recipe: Most shortbread cookie recipes work well. Here is a great recipe from our friend Allie, of Baking a Moment. These cookies hold there shape well.
In the video below you will see how we sculpted the Maine Startup and Create Week logo in two sizes. The larger size is for the cookie mold and the slightly smaller size for a chocolate topper. This created a great effect and quite the impression.
ComposiCast
See more on our ComposiCast Products Page. True black, pure white, or clear resins for mold making and casting. The ComposiCast is developed specifically for use in ImPRESSive Putty and ComposiMold.
• 80D Shore Hardness
• 30-45 Min. Working Time
• Mixes 1:1 by weight or volume (no scale required).
• 3 different versions: White, black, and clear. White and clear can be colored with our colorants.
• Paint-able, sand-able, machinable.
• Make sizes up to 4 cubic inches. For larger sizes, chill your mold, pour the resin in intervals, or add fillers.
•Specifically formulated for ComposiMold and ImPRESSive Putty molds, but it also works great in silicone, latex urethane, and other casting materials.
1. Make a mold of an object YOU choose. Try ComposiMold or ImPRESSive Putty, Reusable Mold Making Materials.
2. Remove the object from the mold. If you are using ComposiMold or ImPRESSive Putty you can easily make a slice in the mold if necessary to remove the object.
3. Spray or wipe the inside of your mold with a mold release, suitable for epoxy resins, such as ComposiMold’s Mold Release.
4. Slowly mix the ComposiCast Part A with Part B in equal proportions by volume or weight. Be sure to scrape the sides of the mixing container to thoroughly combine all material. (You may add our Resin Colorants or textural materials at this time.)
5. Slowly pour the ComposiCast resin mixture into your mold.
6. Let the ComposiCast cure in your mold for approx. 10 hours or overnight. Remove to admire your solid plastic casting! Then repeat steps 3-6 for more castings!
ComposiStone Hard Plaster
Harder Than Plaster...Smoother Than Cement. Go to our ComposiStone order page for more information. This system uses a dry mix and water at a ratio of 2.5 parts powder to 1 part water; and not less than 2 parts powder to 1 part water by weight or volume. It solidifies to a beautiful light Gray color. The texture is similar to a cement feel, but much smoother in appearance.
Ideal For:
- Garden or Outdoor/Lawn Ornaments
- Architecture: house decorations,
- Sculptures: art base, flower pots,
- Craft Parts: planters, coasters,
- Toys, railroad scenery, hobby components, Halloween decorations
Shelf Life and Storage: Composi-Stone should be stored at room temperature in a dry location. Containers must be tightly closed as a protection from moisture and foreign material. As long as it remains dry in powder form, it will remain in good condition.
Crayon:
Crayon is a low melt paraffin wax with color pigments added. And it works great in ComposiMold (Original or Flex) and ImPRESSive Putty.
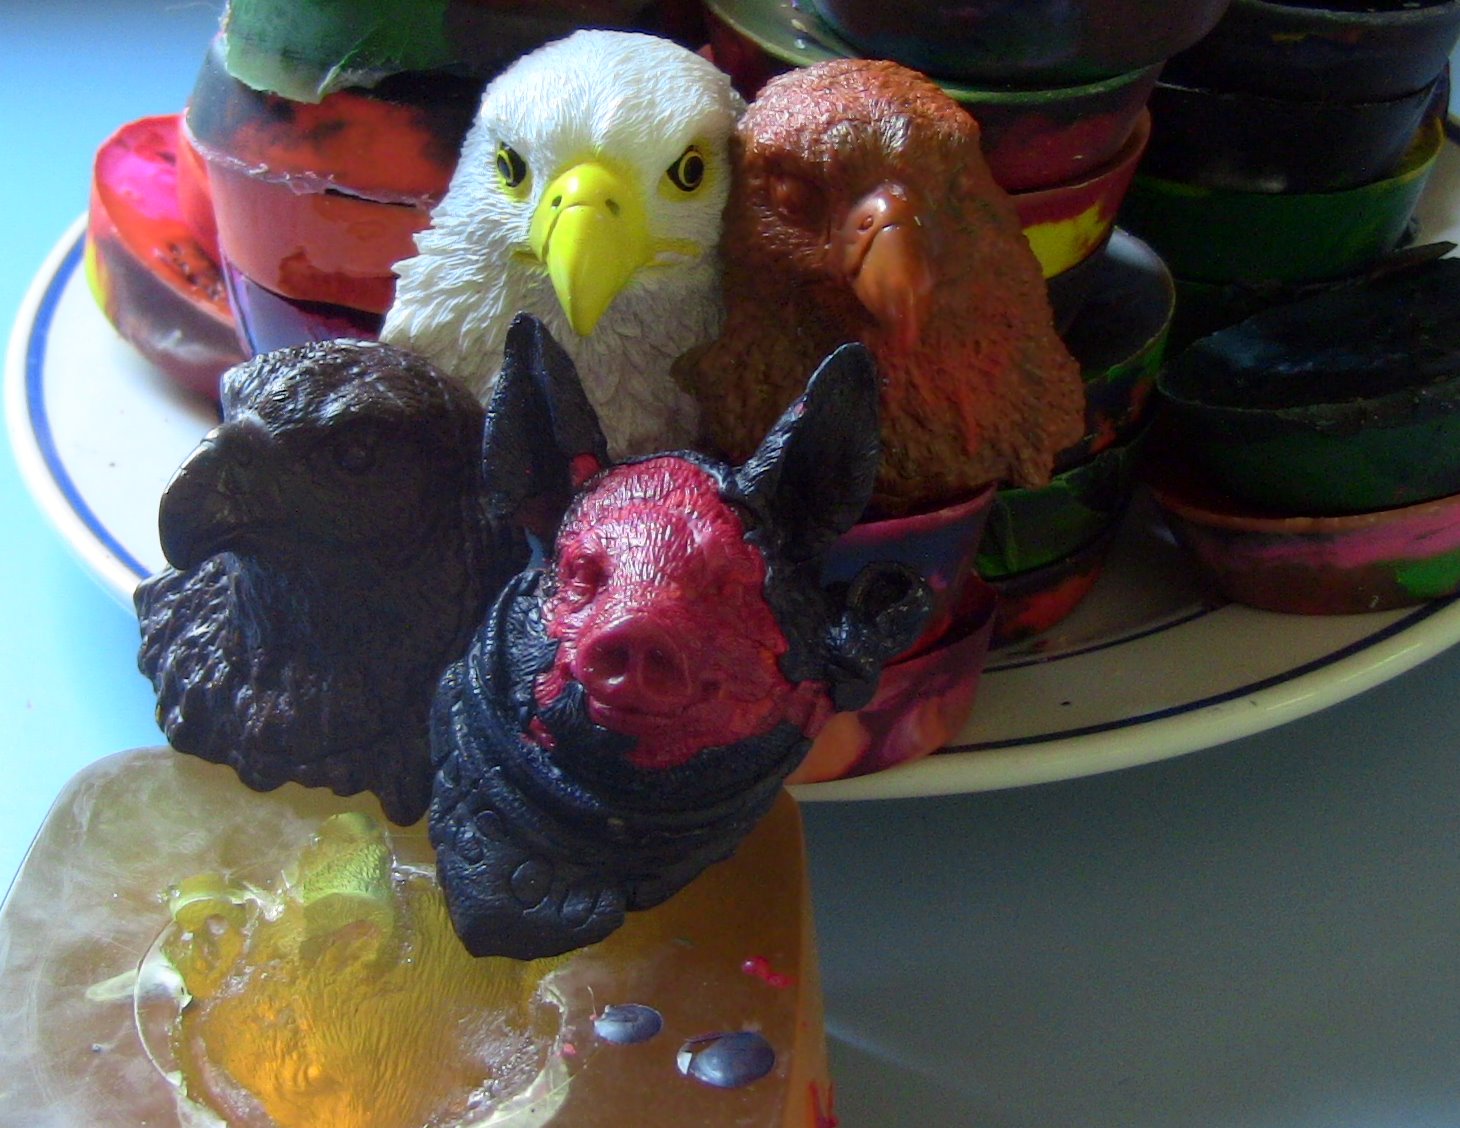
What to do you do with crayons that are broken and worn? You could make round shapes using a muffin tin as seen in the background. Or you could make very cool crayon castings with ComposiMold.
To make: remove the wrapping from the crayons, melt the crayons. We melted in the oven at low temperatures, but you can also do it on the stove. Be careful not to burn the wax.
To prepare the ComposiMold mold: pick a shape, place it in a safe mold box or container. We used a tupperware plastic container (same as what comes with the ComposiMold Starter Kit). Spray with mold release and bubble buster. Pour on the melted ComposiMold and cool in the freezer.
Let the ComposiMold get nice and cold so it can handle the hot wax.
Pour the crayon wax into the cold ComposiMold mold. The pig in front used two different color pours.
Let cool and color!
Encaustics & BeesWax
Encaustics is a mixture of damar resin and beeswax. It works great in the ImPRESSive Putty. For sizes up to approximately 6 cubic inches, you do not need chill your mold. Above 6 inches, chill the ImPRESSive Putty by placing it in the freezer for an hour.
Epoxy Putty, Apoxie Putty, Milliput, or other Sculpting Putty
There are many different epoxy putties and we haven't found any that don't work great with the ComposiMold or ImPRESSive Putty. The putty is pressed into the molds and allowed to cure. For most epoxy putties, the ComposiMold-Original works well, but if you have a very firm putty, use the COmposiMold-Firm. ImPRESSive Putty works extremely well with the putties.
Fondant:
Fondant, Marzipan, Modelling Chocolate, Gum paste, they all work great in ComposiMold. We recommend the ComposiMold-FC. Press softened fondant into your mold with your hands or a rolling pin and remove immediately. No mold release is necessary for fondant. When casting edible treats, you can also use: no-rise cookie dough recipes, gummies, gum paste, ice, butter, and more!
ou can easily create a cast in your mold with fondant or gum paste! This can be done by using the "push mold" technique. This works with fondant, gum paste, modeling chocolate, marzipan, and other edible sugar treats.
Once your ComposiMold has cooled back to original rubbery consistency, remove your original part and simply press the fondant or gum paste into the mold. You can also use a "2 part mold" technique and press a ball of fondant in between the two portions of your mold. Coloring can be added to the fondant before or after you make your cast.
Tips:
- Be careful not to warp the fondant casting when removing it from your mold. You can "bend" the mold away from the cast and let the cast "fall" out of the mold.
- Cooling the fondant or gum paste will make it firmer so it will not deform as easily when you remove it from the mold.
- Do not leave the fondant in the ComposiMold overnight as it will become sticky.
Hot Glue and Embossing Powder:
Hot glue and Embossing Powder work really well in our ImPRESSive Putty. After you have made your mold, just pour or squeeze in the hot glue. Do not pour the hot glue if it is above 220 F.
Jello or Gummy Casting
The key to great Jello Legos is to use ½ the water that the recipe says or the Jello will be too soft and will likely break.
Jello…any flavor…Vegetable oil as a mold release, and ComposiMold to make the mold
Use a microwave to melt the ComposiMold
And a refrigerator to chill the mold and Jello
Use a toothpick to pull away any bubbles from the surface of the Legos. You don’t have pop the bubbles, just pull them away from the surface of the Legos.
Chill the mold in the refrigerator or freezer to make the mold faster.
Before pouring the Jello, make sure it has cooled to room temperature…place it in the refrigerator to cool it faster.
Spray the mold with vegetable oil for a mold release. Wipe away any access. Too much mold release will leave streaks on the castings.
Pour the Jello into the mold cavities.
Low Melt Metals
For metals that melt below around 200 F, use the ImPRESSive Reusable Molding Putty. The ImPRESSive Putty works well with low melt metal such as Wood's Metal. It can handle temperatures up to approximately 200 F when the mold is chilled. ComposiMold does not work with metals.
ImPRESSive Putty also works for casting the wax for the lost wax process. Make a mold like you would for any wax and use it in the lost wax process to make a metal casting.
Metal Casting Using Lost Wax Process
You can make metal casting using shapes you make yourself into metals such as tin, aluminum, lead, silver, gold, and other metals. This is great for die casting, jewelry making, and many other applications where you want metal objects.
WARNING: MELTED METAL CAN CAUSE SEVERE BURNS. BE CAREFUL
The process in a nutshell:
1. Mold your master object with either ComposiMold or ImPRESSive Putty.
2. Make a wax or ComposiMold casting of the object using the mold you made
3. Make a Plaster Mold (add some Plaster Additive into the plaster to let it work better with ComposiMold) of your wax casting a ComposiMold Plaster Casting of the wax or ComposiMold casting
4. Melt out the wax or ComposiMold out of the plaster mold.
5. Be sure to dry the Plaster Mold thoroughly. Give it a couple days to cure and then dry it at 250 to 300 F for an hour.
5. Melt and Pour in the melted metal into the Plaster Casting
6. Break apart the plaster and admire your metal casting You can repeat this process using the reusable molding materials.
Metal Casting with ComposiMold Mold Making and ComposiStone Hard Plaster
Yes, ComposiMold Reusable Mold Making Material and ComposiStone Hard Plaster work great to make metal jewelry making, DIY fishing lures, toys, figurines, or other metal casting. And the nice part about it is you can continue to re-use the ComposiMold for lots of different molds and experiments. Here’s a video where we made a tin casting where we discuss the process for making a lost wax process.
In terms of wax for the casting, you can use the ComposiMold or wax. I like beeswax because it has nice texture, relatively low melt temperatures, and smells nice. You can also use ComposiMold to make a mold of ComposiMold J And not use wax at all: here’s us making a casting that way.
Other waxes will work also, just try to keep the wax temperatures below about 150 F when pouring into the ComposiMold mold. Chill the ComposiMold mold if necessary. If you want to use the jewelry wax, use the ImPRESSive Putty to make the mold instead of the ComposiMold, and that will handle the higher wax temperatures better than ComposiMold.
Metal Casting Options
Tin and other low melt metals are ideal for home castings.
If you want to do aluminum casting, gold castings at home, or DIY silver castings, then you will want a way of melting the metal. Here’s the melting temperatures of different metal casting options:
Melting Temperatures of Common Metals
- Aluminum: 660°C (1220°F)
- Brass: 930°C (1710°F)
- Aluminum Bronze*: 1027-1038°C (1881-1900°F)
- Chromium: 1860°C (3380°F)
- Copper: 1084°C (1983°F)
- Gold: 1063°C (1945°F)
- Cast Iron: 1204°C (2200°F)
- Silver: 961°C (1762°F)
- Zinc: 420°C (787°F)
- Lead: 328°C (622°F)
- Tin 232 C (450 F)
HOWEVER, now here is the warning: Getting to these high temperatures of some of these metals is difficult and potentially dangerous. A furnace, kiln, or high temperature oven is recommended. You will not be able to melt metals other than the low temperature metals such as tin, lead, zinc, and others in your home oven. You might be able to use a propane torch directly onto some of the higher temperature metals to melt, but you should use some sort of high temperature oven, either propane based or electric.
Another option is to experiment with silver jewelry is with polymer metal clays. Here’s a link to a store that works with us https://clayrevolution.com/collections/silver-clay . The shapes can be pressed into ImPRESSive Putty molds to before firing using a propane torch or small furnace. This might be something to explore for you.
When using the ComposiStone plaster mold and casting, be sure it is completely dry. After giving it days to cure and dry, heat the mold to above 250 F for at least an hour. If moisture is in the mold when a very high temperature metal is poured into it, there’s a chance the plaster mold will crack or possibly shatter.
Moldable Plastic
Shapelock or InstaMorph or Friendly Plastic or Polymorph plastic that becomes putty-like when melted in hot water and becomes rigid at Room Temperature. It is made from polycaprolactone plastic. It turns clear when it is in rubbery form and cools to a white slippery, hard, plastic. As a mold material, it is typically a bit hard, but as a casting material it works great in the ImPRESSive Putty. Just press it in to your ImPRESSive Putty mold after you heat it.
The process:
Make your mold from ComposiMold-Firm or ImPRESSive Putty by melting in the microwave and pouring over your part you are duplicating. Start with a simple 1-part mold, but you could make more complicated molds by pressing two halves together.
The mold must be hard to be able to push the Shapelock into the mold. To make the mold stiffer and to allow the ComposiMold-Firm to handle the temperatures of the hot Shapelock, place the PowerMold in the freezer for a while. You do not need to chill the ImPRESSive Putty.
Push the melted moldable plastic into your mold cavity and fill the voids.
That’s it. You don’t need a mold release to make the castings. Since both ImPRESSive Putty (and ComposiMold) and Shapelock are reusable, you can melt and remelt the mold and the Shapelock to make a variety of shapes.
Paper Mache
When making paper mache casting in ComposiMold or ImPRESSive Putty, do it in layers and let the outer layers dry prior to putting on more layers. After you have several dry layers of the paper mache, you can add more layers and the first layers will protect the mold.
Plaster of Paris, Ultracal, Hydrocal, Dental Plaster:
Casting with Plaster of Paris is low cost and easy to do for basic castings.
 For ComposiMold or ImPRESSive Putty Molds, please use our ComposiMold Plaster that has been formulated to cure to a strong solid casting in these molds. By creating cure more quickly, the water in the plaster does not react with the ComposiMold or ImPRESSive Putty to give strong, hard plaster castings. You can also purchase a powder additive to add into any Plaster of Paris to obtain a similar strong, hard casting.
And Plaster of Paris comes as an easy-to-mix formula that mixes with water and dries to a dense, durable, and smooth and bubble free finish. Plaster of Paris is a great material to use for basic castings and molds and art projects because it is simple to mix and use. The Plaster of Paris sets in a few minutes, although it takes an hour before it is ready to be removed from the mold. It takes 24-48 hours to fully cure. Using Plaster of Paris is easy, but there are procedures to follow that will make you successful in your plaster castings.
 The ideal ratio for a Plaster of Paris mixture is 3 parts Plaster of Paris powder to 1 part water. Measure out the water and pour it into your mixing container. Some recipes suggest 2 parts plaster to water, but this will create a much weaker plaster casting. The thicker you can be while still being able to pour the better. Start with a 3 to 1 ratio and if necessary add small amounts of water to make it easier to pour.
- Break any clumps of plaster up with a spoon. If you use your hands to mix, be sure to wear gloves.
- When mixing the water and plaster, you should mix the powder into the water. Pour the plaster powder into the water spreading it out over the surface of the water. After it is poured all poured in, tap the sides of the mixing container and let the plaster powder fill with water to reduce bubble formation. The plaster powder will sink into the water. When you are finished adding the plaster, it will be slightly above the surface of the water and not easily absorbed by the water.
- Gently stir the plaster and water to form a nice slurry similar to a thick pancake mix. Gentle stirring of the plaster will reduce the chance of bubbles being mixed into the mixture.
- Pour the plaster into your molds. If you want to learn how to make your own molds, check out our mold making videos and get your free mold making e-book.
A couple other tips for casting plaster:
- Do not pour any extra plaster down your drain. It can harden and destroy your plumbing. You can dilute the plaster so it does not create a hard plaster or let it harden and throw it away.
- To make colored plaster, you can add colorants to the plaster mix while it is still in liquid/paste form. Remember that you will be adding color to white, so you will need more colorant to make darker colors. Any types of paint will work.
- To paint the plaster casting after it has cured, use a layer of gesso or primer first to seal the plaster, and then you can paint the plaster any way you want.
We also have ComposiStone Hard Plaster which works well for hard, strong plaster castings. ComposiStone is harder than plaster, but smoother than cement. It can be painted with most paints.
Video of Casting Plaster of Paris in ComposiMold Molds
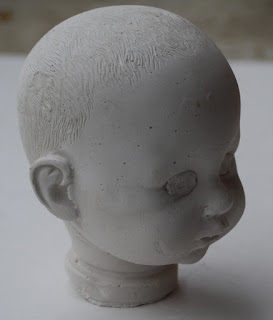
Plaster Casting of a Doll Head (Or Creepy Halloween Ornament)
Polyester resin
Polyester resin is the cheapest of the plastic resins. It is also smelly and harmful to breath in the fumes. It does work with ComposiMold and ImPRESSive Putty. Be sure to be in a well ventillated space, wear gloves, and a heppa filter. Because of the exotherm of the polyester during curing, you can do sizes up to approximately 3 cubic inches if the resin in in a large mass. With ImPRESSive Putty, you can do up to about 6 cubic inches. For larger pieces, chill your mold, add fillers to reduce the amount of resin used, or pour in intervals so each layer cures before doing the next layer. Do not try to change the formulation between the hardener and the resin as this can cause incomplete curing.
ComposiMold can also be used for vacuum bagging of polyester composite parts.
Polymer clay
Polymer clay such as FIMO or Sculpey, Polymer Metal Clay (PMC), Plasticine clays, and others work well in ComposiMold and ImPRESSive Putty to make the original to be molded and also to make the castings. For firm clays, we recommend the ImPRESSive Putty or the ComposiMold-Firm. To use, just press the polymer clay into your molds. Do not bake the polymer clay in the molds. This is a great way of using natural objects or making a large number of castings quickly.
Mold clay and polymer clay by using ComposiMold. Air dry clay and other modeling clays make excellent and simple casting materials to mold clay into the shapes you want. You can learn how to make clay molds with ComposiMold quickly and easily. Use an existing found object to create a clay mold or even sculpt your own master object and then make a mold out of it. You'll be creating duplicates of your sculpture in no time!
Push molds are a simple and effective way of making 3-D objects super fast and easy. For example, buttons can be pushed into a mold in seconds flat using most types of polymer clays or doughy casting materials. It's a great way to make polymer clay charms for jewelry.
To Mold Clay in a ComposiMold Mold:
Follow the basic instructions on our How To Use ComposiMold Page to make a mold with ComposiMold. The tips below will set you up for success when creating a great push mold for polymer clay, FIMO, Sculpey, play dough, PaperClay, and even fondant or gum paste.
The Key to How to Make Clay Push Molds in a ComposiMold Mold:
Think of a push mold as a negative space for you to press your casting material into to pick up the details of the original shape.
1. Soften your modeling clay or air dry clay per product instructions. Often this means working it in your hands until it has warmed slightly and becomes doughy in texture.
2. Apply Mold Release if you find that it helped your modeling clay release from the mold.
3. Press your clay casting material into your mold. Be sure to press the clay into the lowest points of the negative space first. This will ensure that the clay casting material picks up all the details of the mold.
4. Carefully remove your clay casting from the mold. This can be done by turning your mold upside down and letting it fall out. (You may have to slightly bend your mold away from the clay to release it.)
5. If your modeling clay distorts when you pull it out of the mold, refrigerate the mold and clay. This will make the clay harder and firmer allowing you to pull it out of the mold more effectively with less distortion.
Polyurethane or Urethane:
ImPRESSive Putty works with most urethane resins. ComposiMold also works with polyurethane, but is more succeptable to heat concerns on larger molds. Choose a urethane with a longer cure time. These create less heat as they cure. You can also experiment with freezing the mold prior to pouring higher temperature urethane resins. Be sure to use talc powder/baby powder as your mold release before each casting is made.
The keys to using ComposiMold with Urethane resins are:
1. Chill your mold before and during your casting. So chill your
2. Add DRY filler to reduce the amount of resin you are using. Urethanes are very susceptible to water and they will bubble and create heat if they are in contact with moisture. So make sure everything is dry. The filler reduces the amount of resin used to so you have less of an exotherm (heat build up), plus it reduces the cost.
3. Use talcum powder (baby powder) as a mold release to keep things dry.
4. Pour the urethane in intervals so that each cure doesn't create a lot of heat during each pour.
Unless you are looking for specific properties of the urethane, another option is to use the ComposiCast resins, which are epoxy resins and are designed for use with ComposiMold.
Silicone:
Silicones castings work great in ComposiMold molds. Make castings with both platinum or tin cured silicone rubbers. Oogoo also works (Oogoo shrinks by up to 50%).
Soaps:
Shea Butter and Glycerine Soap make great soaps! Chill the mold prior to pouring any higher temperature soaps (above 140ºF) in the ComposiMold. We recommend ComposiMold-Flex because you can flex the soap out of the mold easier without causing damage. ImPRESSive Putty can handle higher temperature soaps.
Waxes can be for candle molds, lost wax process, encaustics, or other application. Soy wax, Paraffin wax, Beeswax, and Melted Crayons work really well. Chill the mold first for higher temperature waxes (above 140ºF to 160 F). Try Soy Candle Wax for candle making and beautiful wax castings. Cools to a white, creamy finish!
ImPRESSive Putty works for higher temperature waxes like microcrystalline waxes used for the lost wax process. Larger pieces may need to be chilled first. ComposiMold cannot quite handle the higher temperature of the microcrystalline wax.
...AND MANY MORE:
For your art, craft, hobby, and hardware projects, you can also try: adding fillers and dyes to casting materials, ComposiMold itself as a rubber casting material, Modeling Compounds, Polyester Resin, Paper Mache and many more!
Do you have a question about using a specific casting material that was not answered here? Email or call anytime!
<p>Metal Casting with ComposiMold Mold Making and ComposiStone HardPlaster</p><p>Yes, ComposiMold Reusable Mold Making Material and ComposiStoneHard Plaster work great to make metal jewelry making, DIY fishing lures, toys,figurines, or other metal casting. And the nice part about it is you can continueto re-use the ComposiMold for lots of different molds and experiments. Here’s avideo where we made a tin casting where we discuss the process formaking a lost wax process.</p><iframe width="560" height="315" src="https://www.youtube.com/embed/EqeZhRfczHA" title="YouTube video player" frameborder="0" allow="accelerometer; autoplay; clipboard-write; encrypted-media; gyroscope; picture-in-picture" allowfullscreen=""></iframe><p>In terms of wax for the casting, you can use the ComposiMoldor wax. I like beeswax because it has nice texture, relatively low melttemperatures, and smells nice. You can also use ComposiMold to make a mold ofComposiMold J And not use wax at all: here’s us making a casting thatway. </p><p>Other waxes will work also, just try to keep the waxtemperatures below about 150 F when pouring into the ComposiMold mold. Chillthe ComposiMold mold if necessary. If you want to use the jewelry wax,use the ImPRESSive Putty to make the mold instead of the ComposiMold, and thatwill handle the higher wax temperatures better than ComposiMold.</p><iframe width="560" height="315" src="https://www.youtube.com/embed/6fTn6I9Fvk0" title="YouTube video player" frameborder="0" allow="accelerometer; autoplay; clipboard-write; encrypted-media; gyroscope; picture-in-picture" allowfullscreen=""></iframe><p><strong>MetalCasting Options</strong></p><p>Tin and other low melt metals are ideal for homecastings.</p><p>If you want to do aluminum casting, gold castings athome, or DIY silver castings, then you will want a way of melting the metal. Here’sthe melting temperatures of different metal casting options:</p><p>Melting Temperatures of Common Metals</p><ul><li>Aluminum:660°C (1220°F)</li><li>Brass:930°C (1710°F)</li><li>AluminumBronze*: 1027-1038°C (1881-1900°F)</li><li>Chromium:1860°C (3380°F)</li><li>Copper:1084°C (1983°F)</li><li>Gold:1063°C (1945°F)</li><li>CastIron: 1204°C (2200°F)</li><li>Silver:961°C (1762°F)</li><li>Zinc:420°C (787°F)</li><li>Lead:328°C (622°F)</li><li>Tin232 C (450 F)</li></ul><p>HOWEVER, now here is the warning: Getting to thesehigh temperatures of some of these metals is difficult and potentiallydangerous. A furnace, kiln, or high temperature oven is recommended. You willnot be able to melt metals other than the low temperature metals such as tin,lead, zinc, and others in your home oven. You might be able to use a propanetorch directly onto some of the higher temperature metals to melt, but youshould use some sort of high temperature oven, either propane based orelectric.</p><p>Another option is to experiment with silver jewelry iswith polymer metal clays. Here’s a link to a store that works with us <a href="https://clayrevolution.com/collections/silver-clay">https://clayrevolution.com/collections/silver-clay</a>. The shapes can be pressed into ImPRESSive Putty molds to before firing usinga propane torch or small furnace. This might be something to explore for you.</p><p>When using the ComposiStone plaster mold and casting, besure it is completely dry. After giving it days to cure and dry, heat the moldto above 250 F for at least an hour. If moisture is in the mold when a veryhigh temperature metal is poured into it, there’s a chance the plaster moldwill crack or possibly shatter.</p><p>Frequently Asked Questions about Metal Casting Using ComposiMold:</p><p>1. Can I do use ComposiMold to make home Silver or Aluminum Castings?</p><p>Yes, with care you can make silver casting in ComposiMold as long as you have a furnace that can get up to at least 1800 F. </p><p>2. Even at this high temperature, the ComposiStone should be able to withstand the higher temperatures of the higher melt metals?</p><p>Yes, as long as it is fully dry so the moisture does not expand and put undue stress on the ComposiStone Casting.</p><p>3. What are the easiest metals to cast with?</p><p>The easiest metals are the low melt metals such a Wood's Metal or others with Bismuth in ithem. These low melt metals can be used in the ImPRESSive Putty directly. Here's an example of our metal casting a toy hand.</p><iframe width="560" height="315" src="https://www.youtube.com/embed/zWB2Sf20aMo" title="YouTube video player" frameborder="0" allow="accelerometer; autoplay; clipboard-write; encrypted-media; gyroscope; picture-in-picture" allowfullscreen=""></iframe><p>What other questions do you have? Let us know.</p>